How to create a network protocol with Scapy
11 May, 2025 - Categories: networking
I was working on a project that required me to implement my own network protocol. At first it seemed incredibly complicated, but it's really not too bad. Fortunately, tools like Scapy exist and the documentation is pretty good. This time around I wanted to jot down an example, mostly for my own notes. So today we are making a new network protocol called "Elvims Super Cool Protocol" or "ESCP"
Mapping Protocols to Network Layers
Before diving into ESCP, let’s quickly recap the four layers of the TCP/IP network stack:
| TCP/IP Layer | Layer Number | Also Known As | What it does |
|---|---|---|---|
| Link | 1 | Network Access | Frames bits onto physical media (Ethernet, Wi‑Fi) |
| Internet | 2 | Network | Routes IP packets between networks (IPv4/IPv6) |
| Transport | 3 | Host-to-Host | End-to-end delivery (TCP, UDP) |
| Application | 4 | Application | High-level protocols (HTTP, DNS, SMTP, custom apps) |
In the simpler TCP/IP view, there are effectively no separate session or presentation layers—those concerns are absorbed into application protocols or libraries.
Creating a "layer 4.5" protocol
I'm refering to the TCP/IP network stack in the table above, but in the full OSI model, the transport layer sits in layer 4. Our ESCP protocol sits just above UDP (transport) but beneath any true application‑layer. Because of this, we could call it a “layer 4.5” protocol:
- Layer 4 (Transport): UDP delivers our datagrams reliably (sort of).
- Our ESCP framing: Defines a fixed‐bit header (sync, version, flags, cmd) and a raw payload blob.
Because ESCP only specifies how bytes are laid out and not what they mean in terms of user‑level operations, it remains a framing layer rather than a full application protocol. This is different from application layer protocols like HTTP that defines methods like GET, POST, Status codes etc. Our protocol only handles the framing of the bits and fields over UDP without specifying any request/response structures.
This might sound overly complex, but it's not that important. Just keep in mind that we aren't implementing a full application layer protocol like HTTP. We are basically shooting packets to some reciever and letting them worry about how to handle them.
ESCP in Scapy: Code Example
#!/usr/bin/env python3
from scapy.all import IPv6, UDP, wrpcap
from scapy.all import BitField, StrFixedLenField, Packet, bind_layers

# Out protocol
class ESCP(Packet):
    name = "ESCP"
    fields_desc = [
        BitField("sync", 0b10101, 5),
        BitField("ver", 0b0011, 4),
        BitField("flags", 0b00, 2),
        BitField("cmd", 0b00010, 5),
        StrFixedLenField("msg", b"Never gonna let you down".ljust(62, b"\x00"), length=62)
    ]

bind_layers(UDP, ESCP, dport=1337)

# Craft a few example packets
packets = []
for i in range(3):
    pkt = (
        IPv6(dst="::1") /
        UDP(sport=40000 + i, dport=1337) /
        ESCP(cmd=i)
    )
    packets.append(pkt)

# Write them all into a pcap file
wrpcap("escp_test.pcap", packets)
print("Written escp_test.pcap with", len(packets), "packets")
Key Points
BitFielddefinitions mirror our bit‑widths: 5 sync + 4 version + 2 flags + 5 cmd = 16 bits of header.StrFixedLenFieldensures a consistent 62‑byte payload; we pad our fun message with\x00.bind_layers(UDP, ESCP, dport=1337)tells Scapy to decode incoming UDP packets on port 1337 as ESCP frames.
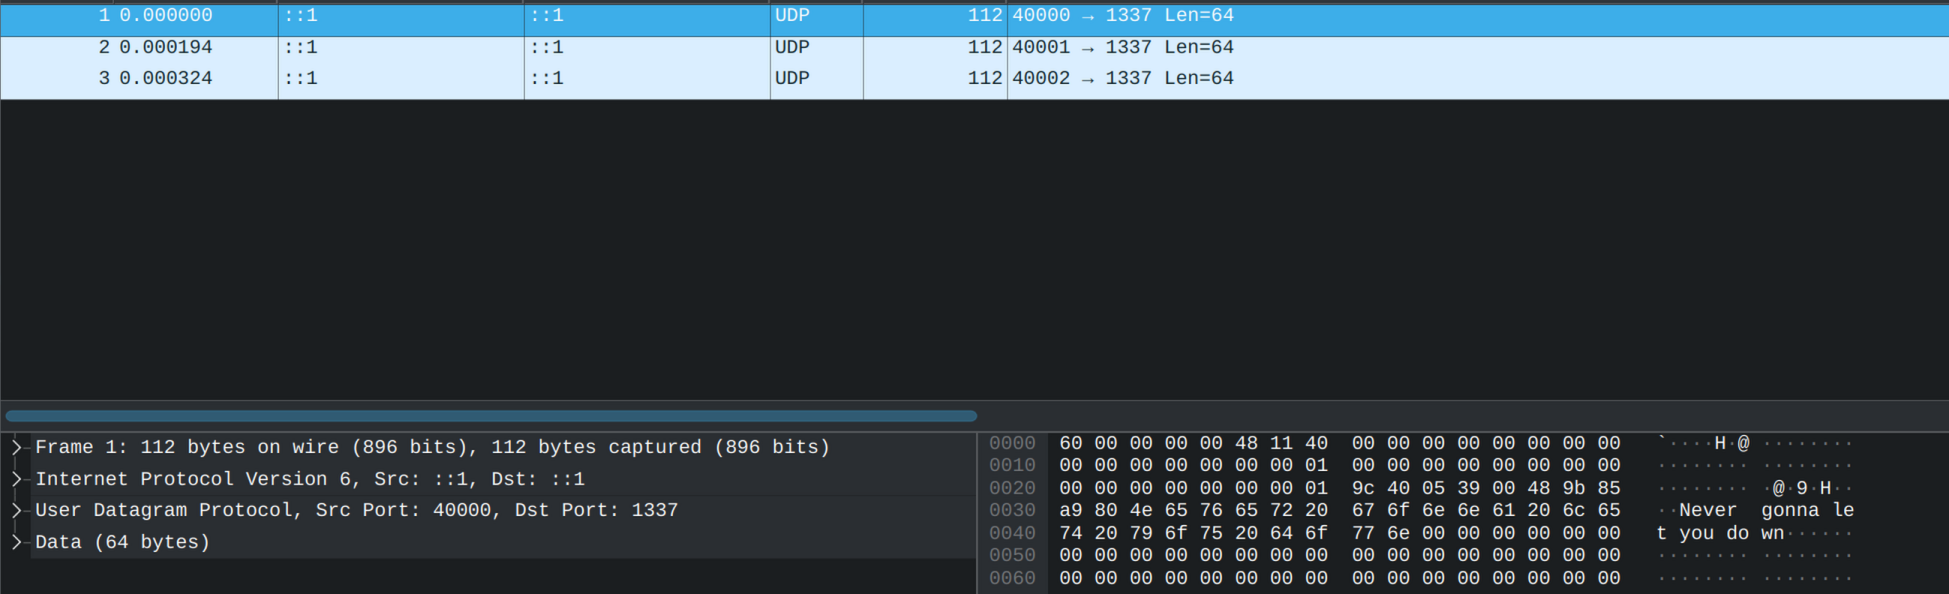
Checking it out in WireShark.
When we run the script it saves a *.pcap that we can inspect in WireShark.
And just like that we've written our own protocol! Now it's up to you to do something with it:
- Create a new protocol for your own purposes
- Use it for CTFs
- Clone or mimic other packages for research purposes
Happy packet crafting! 🍺